


Knitting Tutorial: How Weave In Ends on Back of Garter Stitch
A frequent question from knitters is… how do you weave in the ends on blanket knitting projects?
This blog post focuses on weaving in the ends in garter stitch.
For those who might need a reminder… garter stitch is “knit every row”. It’s the stitch that almost every knitter learns first.
Below are step-by-step tips on weaving in the ends for a blanket, afghan, scarf, wrap, shawl, hat or sweater knitting project that is knit in garter stitch.
These steps can be used with garter stitch projects that have stripes, color-block, or one yarn color. Use the technique below for weaving in ends on the edge of a knitting project or when joining a new skein of yarn in the middle of a garter stitch knitting project.
Weaving in the ends on my Light in the Window color block blanket. Click here to get details on this blanket knitting pattern.
For the striped blanket (shown below) there were lots of ends to weave in after changing yarn colors many times.
The chunky blanket below uses three yarn colors in nine stripes. Get details and purchase the Every Now & Then blanket knitting pattern here on my website or on Ravelry.
This chunky striped blanket is easy to knit with three colors of super bulky yarn. Get details and purchase the Every Now & Then blanket knitting pattern here on my website or on Ravelry.
When changing from one color to the next, I left 10 - 12” tails of yarn. I tied the old yarn and the new yarn together in a loose knot. When the knitting was finished I used a tapestry needle to weave in the ends on the back of the blanket.
HOW TO WEAVE IN ENDS ON THE BACK OF GARTER STITCH:
The example below shows how I wove in the ends this striped blanket project. Click here to get the details on my new ‘Every Now & Then’ striped blanket knitting pattern.
I hope that seeing the process for an actual project will help you visualize how to adapt to your project. There isn’t “one right way” to weave in ends!

First, you will need a tapestry needle. It’s helpful to have an assortment of sizes of tapestry needles on hand. Pick the tapestry needle size that suits the thickness of the yarn. For super bulky yarn, use a large or “jumbo” tapestry needle.
This set of 9 tapestry needles has three sizes that will work with various weights of yarn. Some knitters and crafters prefer tapestry needles that have a bent tip for ease in working it through the knitting or crochet stitches. Here is a link to a set of 16 needles that includes straight needles and a few bent tip needles.
Before starting, be sure to arrange the knitting project so that the back, or “wrong side”, of the knitting is face up. Make sure to weave in the ends on the wrong side of the project. (I recently made the mistake of weaving in an end piece of yarn on the front of a project and had to rip it out!)
Thread the tapestry needle with one “tail” or piece of yarn on the project.
Then… evaluate the best place to weave in the end in the immediate area of knitting.
Of course, the ends will be most hidden when weaving in across the matching yarn color.
I started by feeding the tapestry needle through the closest stitch of the same color yarn. Photo below.

Wrong side of the knitting project is face up. Yarn “tail” is threaded on a large tapestry needle. In order to work towards the “cream” colored stripe, I fed the needle through one nearby stitch first.
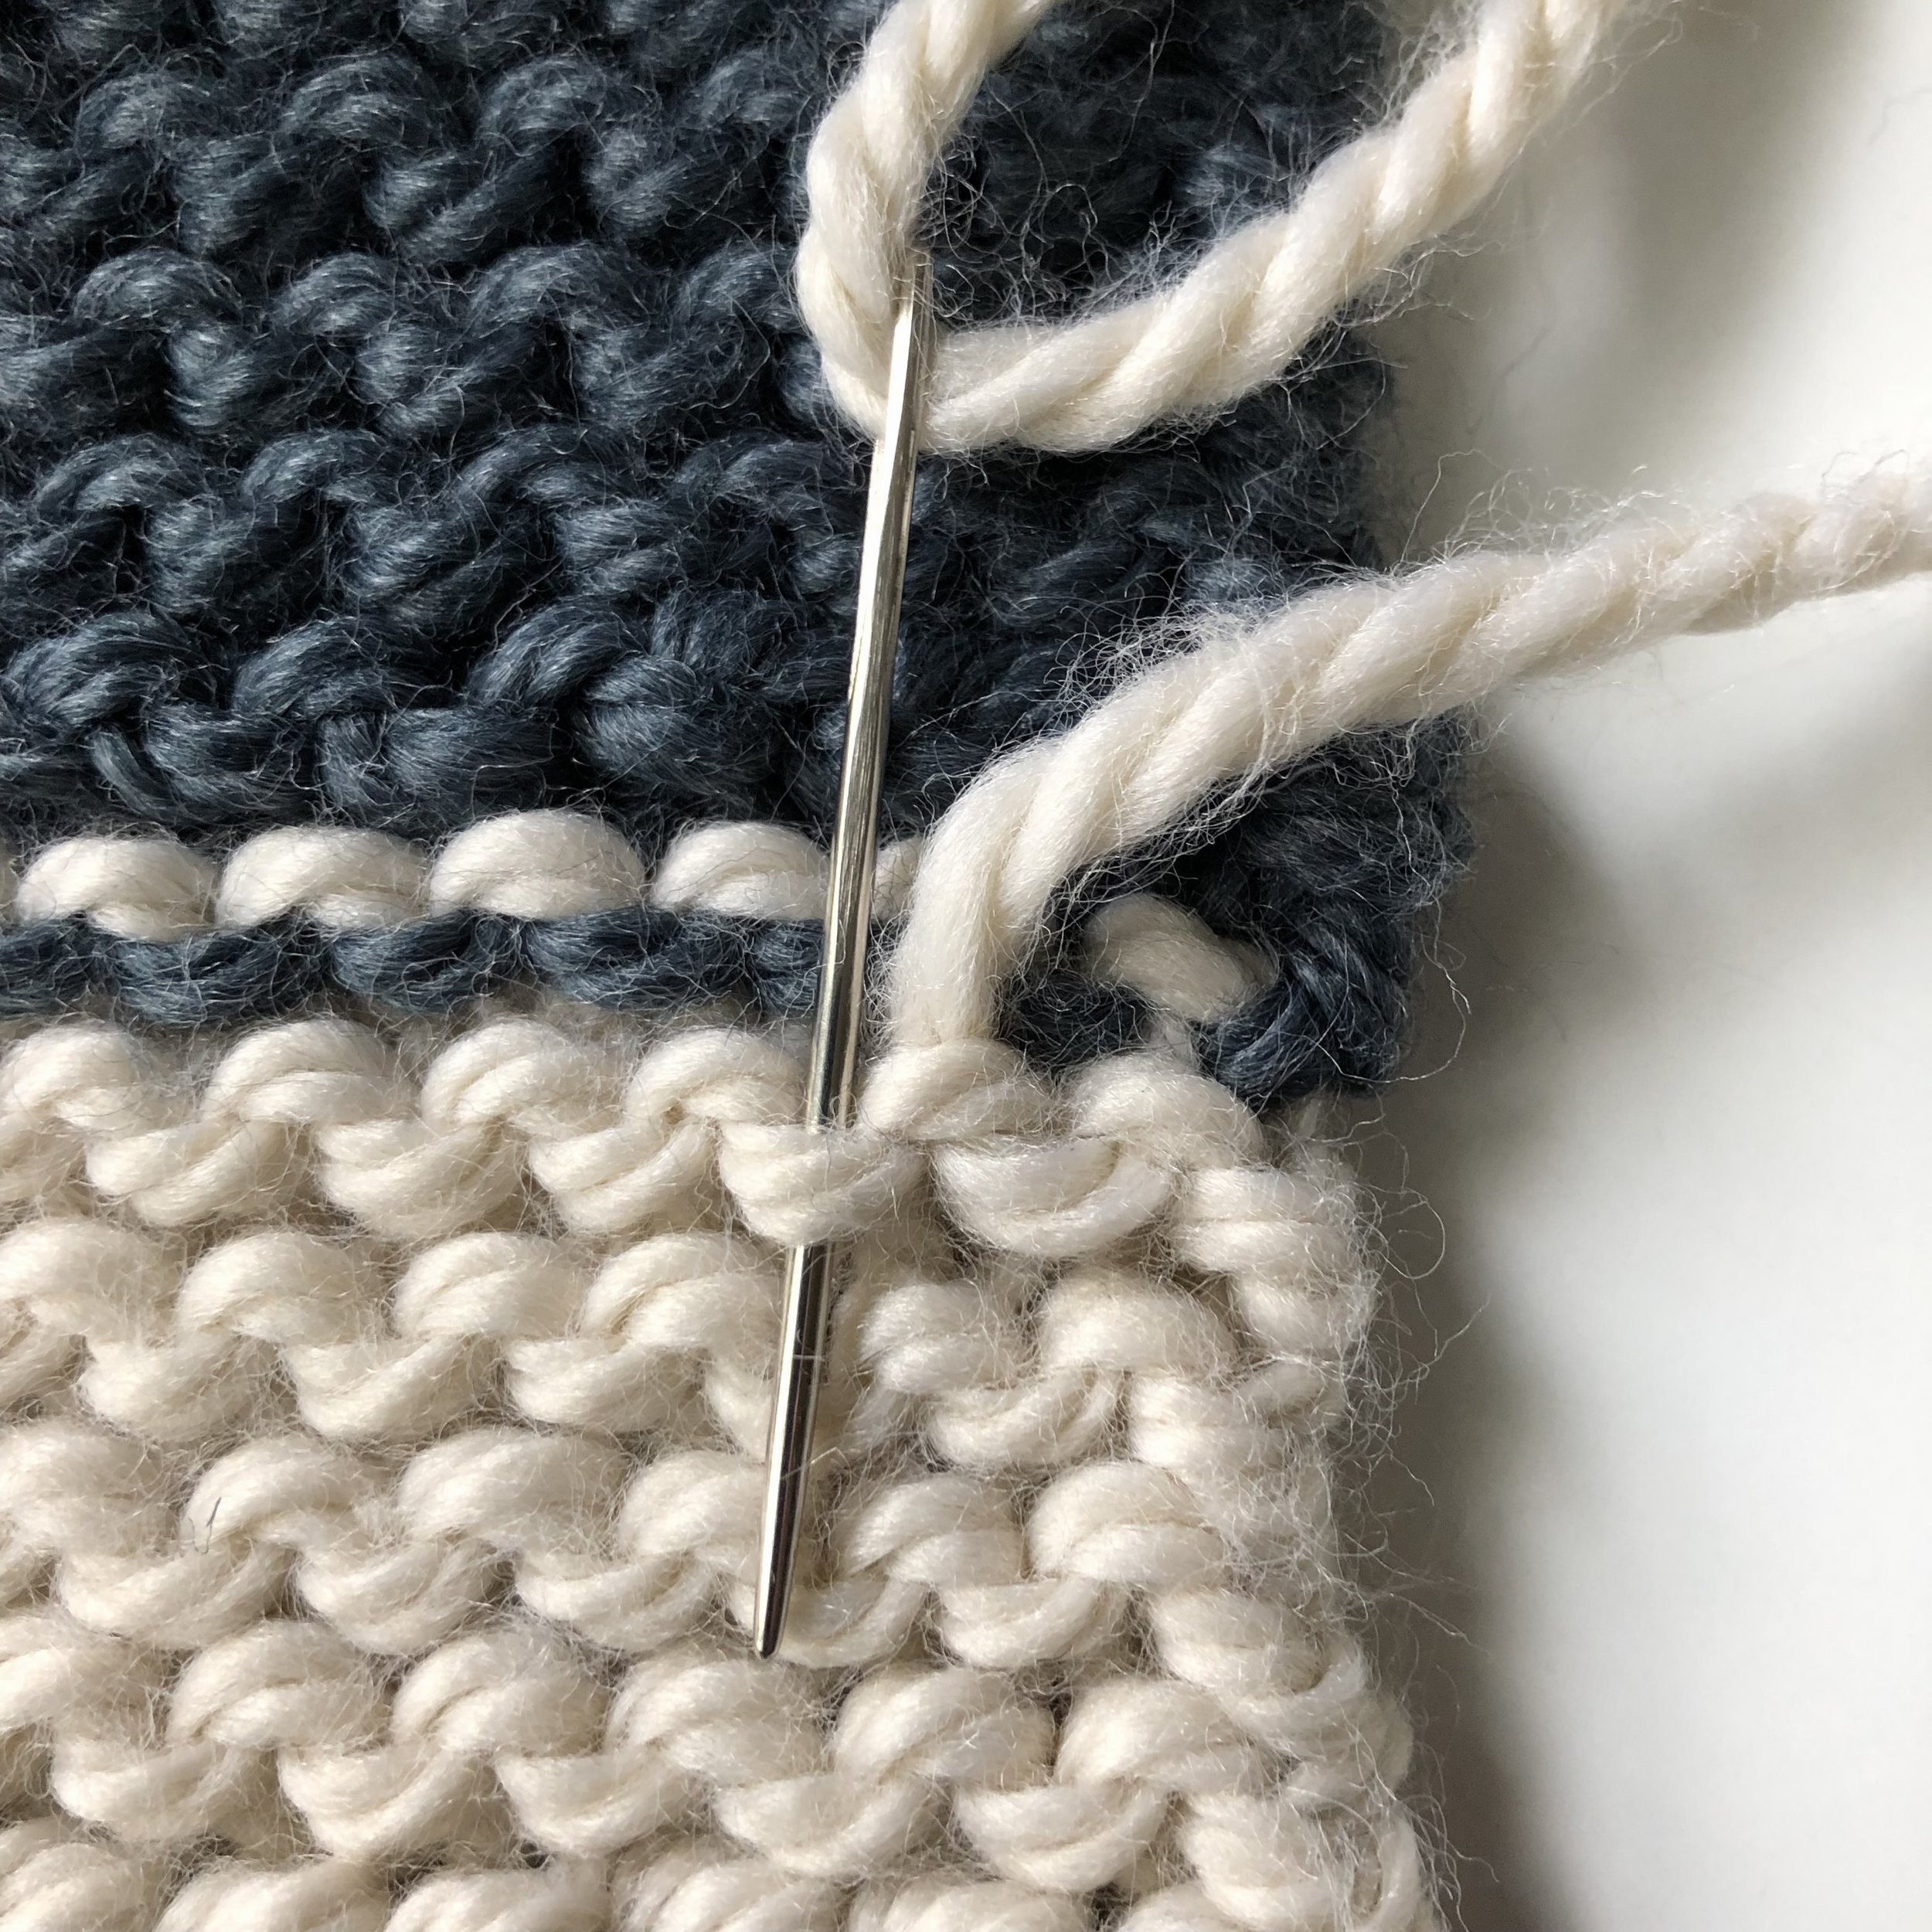
Since I wanted to weave in the cream colored yarn horizontally (from right to left) across a cream colored garter stitch ridge… I “jumped” down to the cream stitch immediately below and threaded the tapestry needle through it.

In order to get “in the groove” with weaving in the yarn horizontally across a cream colored garter stitch ridge… I skipped over to the next purl bump on the top edge of this garter stitch ridge… and fed the needle from below. See the photo below.

Then… I fed the needle down into the immediately adjacent purl bump (on the lower edge of the garter stitch ridge). Photo below.
And then, I fed the needle up through the next purl bump (on the upper part of the garter stitch ridge). Photo below.
Tip: To create some tension between the fibers, it’s helpful to occasionally thread the needle through the yarn of the stitches.

I continued in this manner for at least 3 - 4” of stitches. With a project made with super bulky yarn, I weave in the ends for at least 4” because there are fewer stitches. Weaving the yarn through more stitches creates more intertwining of the yarns.
While you might be able to see the woven in section initially… once the project is complete the woven in section becomes less obvious.
For example, towards the bottom of the photo below… can you see the cream colored yarn that is woven through the lower part of the cream stripe?

Here’s a look at the finished blanket! Below is my new ‘Every Now & Then’ blanket which features bold garter stitch stripes and super bulky yarn. Click here to get the details.
Every Now & Then chunky striped blanket knitting pattern. Click here for details!
JOINING A NEW SKEIN OF YARN IN THE MIDDLE OF A GARTER STITCH PROJECT:
When making a blanket or scarf knitting project with one yarn color, I like to change from one skein to the next in the middle of a row. I like being able to hide the woven in ends in the center of the knitting.

To join a new skein of yarn in the middle of a row… I tie a loose knot on the back of the project where the new yarn is joined. Later, I weave in the ends with a tapestry needle using the same techniques shown above.
Since there are two yarn ends to weave in, I weave the pieces of yarn in opposite directions… one yarn towards the right on a row of garter stitch and the other yarn towards the left.
“Here & Now” striped blanket knitting pattern is easy to knit with bulky #5 weight yarn. I used Lion Brand Hue & Me yarn in five colorways. Click here to get more details and purchase the PDF knitting pattern.
Happy knitting!


