

Free Pattern: How to Knit a Garter Stitch Temperature Blanket with Worsted Yarn
Since I have designed more than 40 blanket knitting patterns in the last seven years, it’s not surprising that I am now obsessed with knitting a temperature blanket! I live in Kansas City (in the center of the U.S.) where the high temperature can range anywhere from 0° F. in the winter to above 100° F. in the summer. The wide range of temperatures makes it fun to pick lots of yarn colors for an interesting temperature blanket knitting project.
For my first temperature blanket, I decided to use the temperature data for last year (2022). We tackled a big DIY remodeling project last spring. I spent many days with a paint brush in my hand instead of knitting needles! A 2022 temperature blanket seems fitting after all of our hard work last year. Of course, I picked yarn colors to coordinate with our home. (More about my yarn colors below!)
In this blog post I’m sharing my plan for knitting a manageable, usable size temperature blanket. I’m knitting a garter stitch blanket in three panels that will be seamed together. The finished size will be approximately 45” wide x 58” long… the perfect size for a large cozy afghan. I’m using 14 colors of Berroco Vintage worsted #4 weight yarn. I love how my blanket looks in the early stages of knitting!
Keep reading to download the FREE PDF digital knitting pattern for this easy to knit temperature blanket!
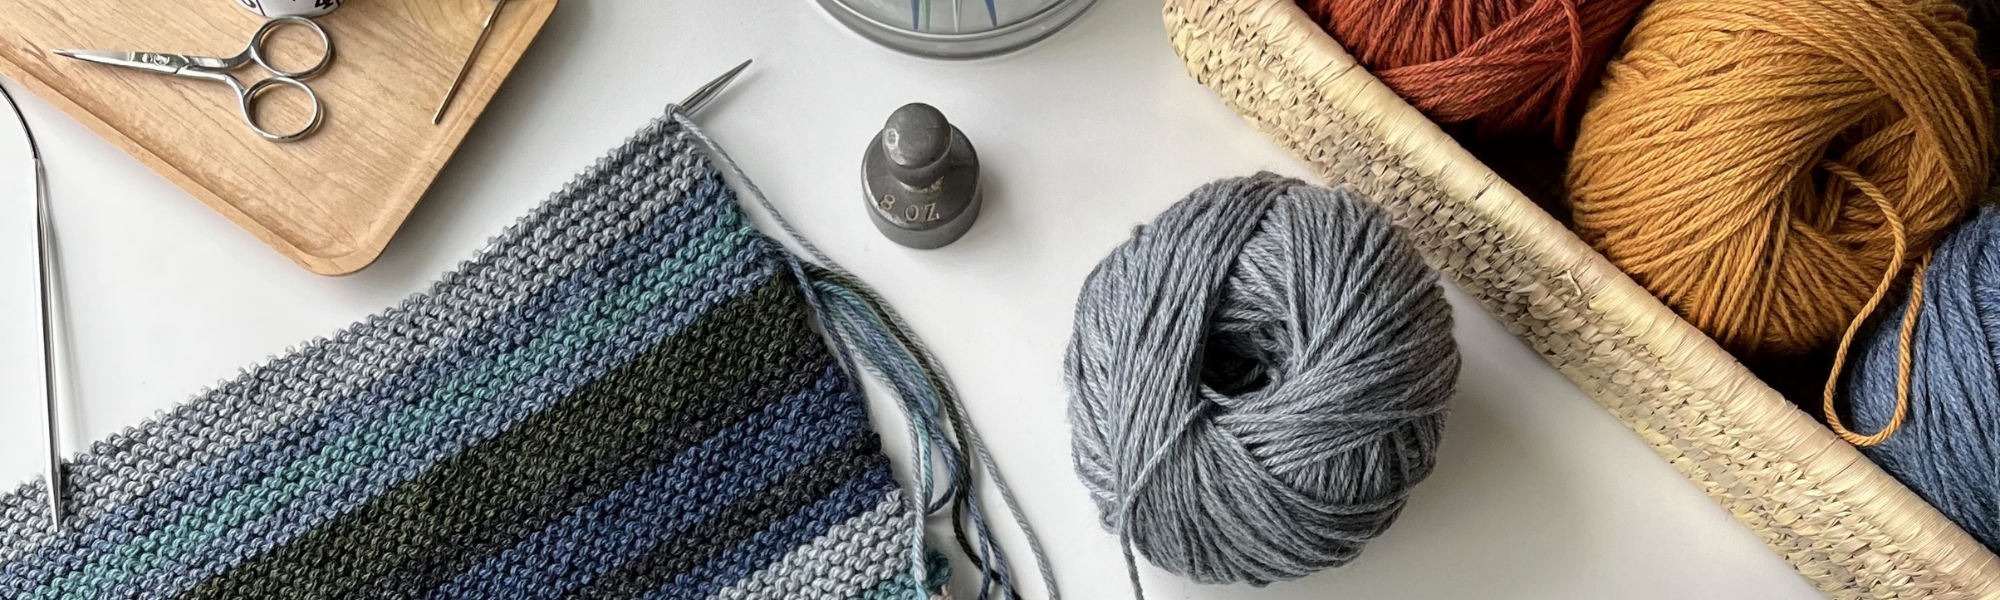
My 2022 Temperature Blanket is on the needles! I’m using the weather data from last year to knit a blanket in three panels that will be seamed together. I started with Panel #1… knitting 4 rows for each day. In this photo, my blanket shows the knitting for the temperatures for January 1st (at the bottom of the photo) through February 9th (on the needles). In that 40 day span the high temperatures ranged from 15° F. to 65° F. The winter temperatures in Kansas City can vary quite a bit so I have already used quite a few yarn colors! The Berroco Vintage yarn colors shown in this photo are: Charcoal, Douglas Fir, Acai (dark blue), Jalapeno, Breezeway and Twilight. SHOP FOR BERROCO VINTAGE YARN: At many local yarn shops | Jimmy Beans Wool | Knit Picks
Click here to see my blog post with updates on my first temperature blanket knitting project. You can also see updates on my Ravelry project page.
APRIL 2023 UPDATE: I finished knitting my first temperature blanket! I love how it turned out! The yarn colors visually represent the changes in temperatures through the year. The first panel (on the left) represents the first four months of the year. The center panel represents the warmest months of year… early May through September 1st. And, the third panel (on the right) represents the last four months of the year ending at the bottom with December 31st.
I finished making my 2022 temperature blanket on April 5, 2023.
Are you wondering… what is a temperature blanket? Click here to see my blog post with lots more information.
Keep reading below for all the details and my free temperature blanket knitting pattern directions.
HOW TO KNIT A TEMPERATURE BLANKET THAT ISN’T HUGE?
One of the things I noticed when researching temperature blanket knitting projects is that knitters often end up with an extremely large blanket... perhaps much larger than they anticipated when starting the project. For example, with worsted weight yarn and knitting one garter stitch ridge across the entire width of the blanket, for 365 days in a year… a blanket could turn out approximately 7 feet long. If bulky yarn is used… the blanket could turn out approximately 12 feet long!
When I was thinking about how to knit a manageable size temperature blanket (representing the temperatures for 365 days in a year) I turned to my Light in the Window Blanket knitting pattern as a starting point. After doing some calculations, I realized that 365 days could be divided up into three sections to knit a blanket in panels. Each blanket panel is about 15” wide. After completing the knitting, the three panels are seamed together with yarn, a tapestry needle and mattress stitch. Read further in this blog post for the specific details on how I am making my blanket.
April 2023 Update: My temperature blanket is finished! Click here to see step-by-step project photos.
TEMPERATURE BLANKET PLANNING
Before beginning, please see my blog post about planning a temperature blanket for lots of details.
You can also download these free printables to help with organizing your project:
FINISHED SIZE OF BLANKET
The directions below are to knit a blanket that is approximately 45” wide x 58” long using worsted #4 weight yarn.
Using a lighter weight yarn will result in a smaller blanket. Using bulky weight yarn would result in a much larger blanket.
WORSTED #4 WEIGHT YARN
After considering many yarn options, I am using Berroco Vintage worsted yarn. This long-standing, popular yarn is available in more than 90 gorgeous colorways making it a great choice for picking a custom gradient of colors for a temperature blanket.
I purchased some of the yarn for my project at Suncoast Yarns in Tampa, Florida when I was on vacation. And, I found several more beautiful colorways online from Jimmy Beans Wool.
SHOP FOR BERROCO VINTAGE YARN: At many local yarn shops | Jimmy Beans Wool | Knit Picks
This pattern will also work well with many other worsted #4 weight yarns.
For more yarn suggestions see my blog post about planning a temperature blanket project.
There are also more yarn suggestions in various fibers and price levels in my blog post about more than 25 yarns for blanket knitting.
APPROXIMATE YARDAGE NEEDED
The estimates below refer to the specific temperature blanket knitting pattern outlined below.
Knitting a 45” wide x 58” long blanket in garter stitch with worsted weight yarn… entirely in one yarn color… requires approximately 2,550 - 2,700 yards of yarn. However, knitting the same size blanket as a temperature blanket (with lots of yarn colors) will require more yarn!
To knit the three panel garter stitch blanket outlined below start with at least 2,900 – 3,100 yards of worsted weight yarn in an assortment of 10 - 25 yarn colors. There are many factors that could impact how much yarn is needed including:
Changing yarn colors frequently uses more yarn. All those ends to weave in!
The idea of a temperature blanket is to incorporate many yarn colors. How those yarn colors get used is dependent on how you select your temperature categories and how the weather plays out through the year. Perhaps one month it will be much warmer than usual and the colorways you selected for warm or hot days will get used more than anticipated.
Some yarn colors may not be used as much as others. If you assign a dark red for days that are 100° & above… and there are only 5 days in the year that fall in that category… you won’t use much of the skein of dark red. But, you may need more than one skein of the orange assigned to 90 – 99°.
I purchased one skein of each of 14 colorways in Berroco Vintage worsted #4 weight yarn. Each skein has 218 yards for a total of 3,052 yards.
After knitting about 45 days of my 2022 blanket (I’m using last year’s weather data), I have calculated that one skein (218 yards) is enough yarn to knit approximately 31 days. Each day of knitting (4 rows of garter stitch) requires approximately 7 yards of yarn.
APRIL 2023 UPDATE - YARDAGE USED: I used 2550 yards of yarn to complete my temperature blanket. I had approximately 500 yards of yarn leftover in various colorways from the 14 skeins (3052 yards) I purchased for the project.
NOTE: These yarn quantities are specific to the pattern outlined below using worsted weight yarn.
This is Panel #2 of my 2022 temperature blanket representing the high temperature for each day from May 3, 2022 through July 1, 2022. Hot days stand out in the warm colorways of Berroco Vintage: Butternut (86 - 88°), Marmalade (89 - 92°), Pumpkin (93 - 97°) and Black Cherry (98° & above). I love how the yellow shades look next to the calm neutrals: Overcast (73 - 77°), Smoke (79 - 82°) and Rye (83 - 85°). Click here to see more photos of this project.
If you are knitting one-day-at-a-time through the year... keep in mind that there may be a need to purchase more yarn. Or, you can change 1 or 2 days to the next closest temperature category… and its assigned yarn color… to avoid having to buy more yarn. This is a great option if you think you are only a couple of days short on a yarn color. Remain flexible and “adapt to the weather”!
For more details, be sure to read my tips about planning a temperature blanket.
YARN COLORS
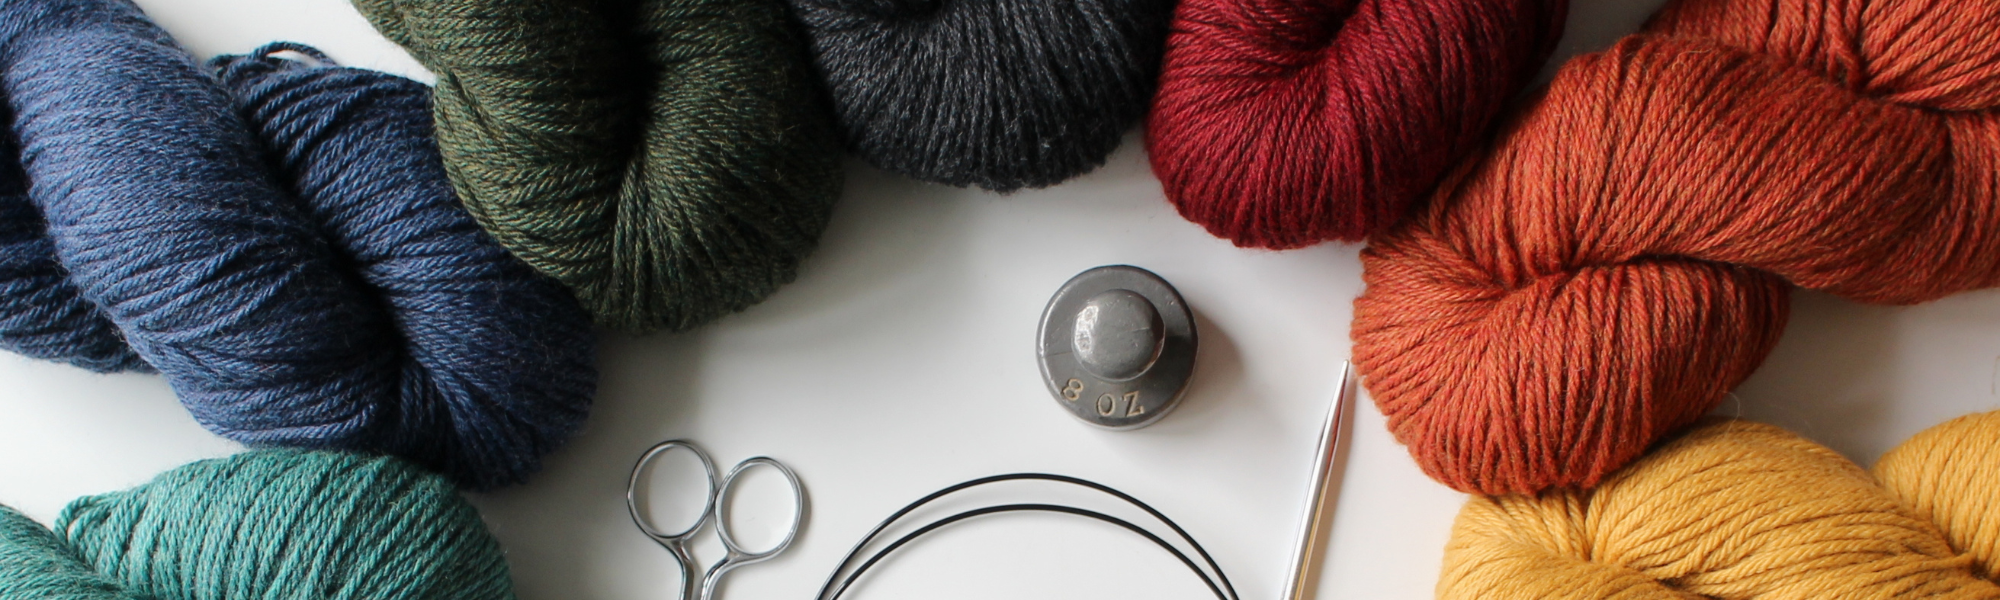
I am using 14 yarn colorways in Berroco Vintage worsted #4 weight yarn in: Black Cherry, Pumpkin, Marmalade, Butternut, Rye, Smoke, Overcast, Sage, Twilight, Breezeway, Jalapeno, Acai, Douglas Fir and Charcoal. Shop all the beautiful colorways of Berroco Vintage #4 Worsted: Jimmy Beans Wool | Knit Picks
Since I wanted my finished blanket to coordinate with our family room, I started with selecting the blue, green and gray colorways that were good matches for our home. Then, I added the warm tones to illustrate the hot Kansas City summer days!
The knitting pattern outlined below can accommodate any number of colorways. Most makers choose between 10 - 25 yarn colors for a temperature blanket.
Click here to see my blog post with other ideas for choosing yarn colors.
The Berroco Vintage yarn colors I selected for my first temperature blanket knitting project are (starting with red in upper right and working clockwise): Black Cherry, Pumpkin, Butternut, Rye, Smoke, Overcast, Sage, Twilight, Breezeway, Jalapeno, Acai, Douglas Fir and Charcoal. After taking this photo I added a 14th yarn color… Marmalade. See all the beautiful colorways of Berroco Vintage #4 Worsted: Jimmy Beans Wool | Knit Picks
Sign up for the Fifty Four Ten Studio email newsletter! You'll be the first to know about new Fifty Four Ten Studio knitting patterns, free pattern offers, and special discounts. Click here to sign up.
GAUGE IN GARTER STITCH
Garter stitch with US size 8 needles: 18 sts & 34 rows (17 garter ridges) = 4”
Take time to check gauge by casting on 25 stitches and knit every row (garter stitch) for at least 5”. Exact gauge is not essential. But, you want to make sure you have the appropriate needle size for your yarn and knitting tension. And, a significantly different gauge may require more (or less) yarn and impact finished size of blanket.
KNITTING NEEDLES
US 8 knitting needles or size to obtain gauge
I’m using Knitters Pride Nova Platina US 8 circular knitting needles. Straight or circular knitting needles may be used. If purchasing circular knitting needles… I like 32” or 40” length because they are useful for other blanket knitting projects that are knit in one piece. Circular needles allow room for lots of stitches on bigger projects.
If using a different weight yarn… select the needle size that gives the best appearance for your yarn and knitting tension.
PATTERN NOTES & TIPS
First Stitch of Row: I tend to pull the first stitch of each row just a bit tighter. I do not use the “slip first stitch” method because a fairly invisible seam can be achieved without slipping the first stitch.
Right Side of Knitting: Pick the right side of knitting based on the more attractive side of your cast on edge. Click here to see photos on my website.
Clip Marker: Use a clip on marker to identify right side (RS) of your project. This is especially helpful for beginners.
Changing Colors: Always change from one yarn color to next when beginning a right side (RS) row. Tie a loose knot and leave 8” tails to weave in later.
I'm guessing that the most popular questions for this project will be about changing yarn colors.
How do you change from one color to the next? The quick answer is I use an approach that starts with the basics like shown in this video. Then, tie a loose knot with the old and new yarn and weave in the ends later. I’m trying to improve and refine this technique and hope to get back to you with a how to blog post in the coming weeks!
How do you weave in the yarn ends? Here’s a link to my blog post about weaving in ends on garter stitch.
Is there an easier way to change colors that avoids weaving in the ends? Early in my project I experimented with a couple techniques that involve knitting one stitch with two strands of yarn held together to “anchor” the new yarn color. I did not like the results with either option because the edge of my knitting got too bulky. I also considered using the “magic knot” method but did not want a lot of knots clustered near the edge of my knitting.
I’m working on strategies to improve my technique on joining a new color of yarn. I hope to share what I’ve learned in the next few weeks!
PLAN YOUR TEMPERATURE CATEGORIES
For my temperature blanket knitting project I am using the daily high temperature. I thought about using 10° or 5° temperature increments to assign my yarn colors. However, after researching the 2022 high temperatures in Kansas City, I realized that I needed to tailor my temperature categories to our local weather in order to incorporate lots of different yarn colors.
Even though we experience a wide range of temperatures in Kansas City about half of the days are on the warmer end of the temperature range (70° F. or above). I took that information into account when planning my temperature categories so I would use all 14 of the colors in a fairly balanced way. I’m hopeful that this research and pre-planning will help me avoid running out of yarn. (Of course, since I already have the temperature data from last year it makes it possible to plan and strategize!)
Click here to see my blog post with tips on how to find temperature data.
Here’s a look at the temperature blanket categories that I picked for my 2022 Kansas City Temperature Blanket:
For my project, I am using Berroco Vintage worsted yarn in these colorways (starting with the dark red on the right): Black Cherry, Pumpkin, Butternut, Rye, Smoke, Overcast, Sage, Twilight, Breezeway, Jalapeno, Acai, Douglas Fir and Charcoal. After taking this photo I added the Marmalade colorway to make a total of 14 yarn colors. One yarn color is assigned to each temperature category.
After assigning one yarn color to each temperature category proceed to the knitting directions below.
This is my yarn color card for my 2022 Temperature Blanket. All of the yarn colors are Berroco Vintage worsted yarn. I purchased one skein of each colorway. Click here to download my FREE Temperature Blanket Color Card PDF. Print it on card stock, punch holes, fill in all the details for your temperature blanket project, and add pieces of yarn. I used two 8” pieces of yarn for each color. Click here to see more photos of my temperature blanket project in progress.
FREE KNITTING PATTERN FOR TEMPERATURE BLANKET
Follow directions below or click here to download my FREE PDF temperature blanket knitting pattern.
Click here to add this FREE pattern to your Ravelry library.
Blanket is knit in garter stitch in three long rectangular panels (Panels 1, 2 and 3) which are then hand seamed together.
The blanket is designed to document the temperatures for 365 (or 366) days of one calendar year. Each day of the year is represented by knitting 4 rows (2 garter stitch ridges).
There are two options for how to document the temperatures using this pattern:
1. Document the high temperature only by knitting 4 rows in one yarn color. I am using the high temperature for each day.
2. Document the high and low temperatures for each day by knitting 2 rows (1 garter stitch ridge) in the yarn color for the high temperature and 2 rows in the yarn color for the low temperature.
Panel #1 of my blanket is in progress! This photo shows 40 days represented so far. I love how it is coming together! Yes… there will be quite a few ends to weave in when I’m done. It’s part of the process! The Berroco Vintage yarn colors shown in the knitting and on the table are: Charcoal, Douglas Fir, Acai (dark blue), Jalapeno, Breezeway and Twilight. Click here to see more photos of this project.
PANEL 1: With yarn color for Day #1 and US size 8 needles cast on 68 stitches.
Day #1: Knit every row for 4 rows (2 garter stitch ridges). Stop when finish working a wrong side row. Here’s a link to my blog post about identifying the right side of garter stitch.
Check off completion of Day #1 on the Temperature Blanket Planner.
Day #2: With right side of knitting facing, change to the yarn color for Day #2 and knit 4 rows (2 garter stitch ridges). (If the yarn color is the same for Day #2, there is no need to change yarn colors.)
Continue in this manner, checking off each date as completed until Day #122. On the 4th row of Day #122, with wrong side of knitting facing bind off loosely knitwise.
PANEL 2: With yarn color for Day #123 and US size 8 needles cast on 68 stitches.
Work in the same manner as for Panel 1, changing yarn colors as appropriate for each day. Check off each date as completed.
Before binding off verify that Panel 2 has the same number of garter stitch ridges as Panel 1.
On the 4th row of Day #244, with wrong side of knitting facing bind off loosely knitwise.
PANEL 3: With yarn color for Day #245 and US size 8 needles cast on 68 stitches.
Work in the same manner as for Panel 1, changing yarn colors as appropriate for each day. Be sure to check off each date as completed.
NOTE: For a 365 day year it is necessary to knit 4 extra rows to make Panel 3 the same length as Panels 1 and 2. In a “leap year” there are 366 days which divides equally by 3… so it is not necessary to knit extra rows.
Before binding off verify that Panel 3 has the same number of garter stitch ridges as Panels 1 and 2.
On the 4th row of Day #365 (or 366), with wrong side of knitting facing bind off loosely knitwise.
FINISHING INSTRUCTIONS
1.Weave in ends on the wrong side of the blanket working horizontally across at least 2” of garter stitch ridge. Weaving in the ends first allows you to neaten up any loose spots on the edges that occur when changing colors. (I’m planning to save all the end pieces of yarn to put in clear ball shaped ornaments to hang on the Christmas tree!)
It will be easier and neater to have all (or most) of the ends woven in before seaming the three panels together.
Here’s a link to my blog post about weaving in ends on the wrong side of garter stitch.

A close up of weaving in the ends on the back of my garter stitch temperature blanket project. Click here to see my blog post about weaving in ends on the wrong side of garter stitch.
Of course, the ends will be most hidden when weaving in across the matching yarn color. To create some tension between the fibers, it’s helpful to occasionally thread the needle through the yarn of the stitches. Work across about 2 - 3” of stitches and then snip the yarn leaving about 1/4” of yarn. Then, use the tip of the tapestry needle to “fray” (separate the strands of yarn) the 1/4” of yarn to help discourage the yarn from slipping out.
It did take a while to weave in the ends… but not nearly as long as it took to knit the blanket. Click here to see step-by-step tips on weaving in the ends on the wrong side of garter stitch.
2. Wet block the three panels. This makes a big improvement on the appearance of the knitting… evening out stitches. Click here to see my step-by-step tips for blocking a blanket.
I wet blocked the three panels before stitching up the seams. Click here to get my step-by-step tips for blocking. The blocking mats I used are Hephaestus Crafts blocking mats. This attractive boxed set includes 9 white mats with 1” grids, a box of 150 T-pins and a nice tape measure. It’s a great set!
3. Baste the panels together. Neatly arrange the three panels on the floor or large table using the diagram in this FREE PDF as a guide. Arrange panels carefully so corners match up evenly. Starting at the cast on edges, count 20 garter stitch ridges and then use 8” pieces of yarn and tapestry needle to baste panels together where the garter stitch ridges match up. Tie a knot in each basting yarn to temporarily hold panels in place. Count the next 20 garter stitch ridges and baste at that point. Repeat until two of the panels are loosely held together with basting yarn.
4. Sew up seams with mattress stitch. With right side of knitting facing and starting at top of blanket, sew up seam between Panels 1 and 2 using a tapestry needle and an 18” piece of neutral colored yarn. Feed tapestry needle through edge stitches one at a time, alternating from one panel to the other. See photos below with additional details in captions.
Remove basting yarns as complete each section of the seam. As needed, join another 18” piece of yarn.
Use same technique to seam Panels 2 and 3 together.
Sew up seams using yarn, a tapestry needle and mattress stitch. Feed tapestry needle through edge stitches one at a time, alternating from one panel to the other. Note that on the left panel I fed the needle through the “lower bump” of the garter stitch on the edge of the knitting.
I used one of the gray colorways for stitching up the seams. With this mattress stitch seaming technique, the gray yarn will not be visible. Remove the basting yarn when complete seaming a section. Note that on the right panel, I fed the needle through the “top bump” closest to the edge of the knitting. Being consistent in seaming each stitch makes a huge impact on the final appearance.
LIGHT IN THE WINDOW BLANKET KNITTING PATTERN
If you like knitting a blanket in sections and then seaming it together… see my Light in the Window blanket knitting pattern. The blanket is a modern, color-block design that incorporates five yarn colors.

Light in the Window Blanket knitting pattern is easy to knit with worsted or Aran weight yarn. The blanket is knit in three panels and seamed together. I used five colorways of Lion Brand Basic Stitch Anti-Pilling yarn. Get more details and purchase the PDF pattern here on my website, on Ravelry or from my Etsy shop.
OTHER BLANKET KNITTING PROJECT OPTIONS:
Do you prefer a more predictable project? Not sure you want to commit to working on a blanket for an entire year? If so… see my collection of blanket and scarf knitting patterns for DK, worsted, bulky and super bulky yarn.
Shop my knitting patterns here on my website, Ravelry or Etsy.
UPDATES ON MY TEMPERATURE BLANKET PROJECT
January 29, 2023: As of today I have knit 86 days (Jan. 1st - March 27th) of my 2022 temperature blanket. The first panel of my blanket is about 70% complete!
Click here to see all the work-in-progress photos of my temperature blanket.
This knitting documents the high temperature in Kansas City for January 1, 2022 - March 27, 2022 for a total of 86 days. I knit 4 rows in garter stitch for each date. Since I am using last year’s temperature data I am making a lot of progress on my blanket. Click here to see all the work-in-progress photos of my temperature blanket.
SHARE YOUR PROJECT
If you decide to start a temperature blanket I would love to see what you are making!
Instagram - Share a photo of your project on Instagram with the hashtags #temperatureblanket #temperatureblanket2023… and tag me with @fiftyfourtenstudio and #fiftyfourtenstudio. (Keep in mind that if your Instagram account is private I will not be able to see your photo.)
Ravelry Group - Share your project on the Fifty Four Ten Studio Ravelry Group page.
Email - You can also email a photo of your project to Mary Lee at: FiftyFourTenStudio@gmail.com
I am enjoying knitting my first temperature blanket so much that I’m already thinking about how to make the next one and what yarn colors to use!
Happy knitting!

Sign up for my Fifty Four Ten Studio newsletter! Click here to sign up. Expect to receive one or two newsletter emails per month. (I do not share email addresses with any other person or business.)
Here are links to a couple of newsletters from 2022.
December 2022 - My best selling patterns of the year.
February 2022 - Knitting for little ones.